What's New in Release 5.0.4Release 5.0.4, June 8, 2014 |
|||||||||||||||||||||||||||||||||||||||||||||||||||||||||||||||||||||||||||||||||||||||||||||||||||||||||||||||||||||||||||||||||||||||||||||||||||||||||||||||||||||||||||||||||||||||||||||
New Features and EnhancementsGeneralSourcing & Contract ManagementSavings OpportunitiesSupply Contracts
Services ContractsProjectsPanel Changes
Pulse
Supply Chain - Materials Management
Financials - Accounts Payable and General Ledger
AdministrationReports
Problem ResolutionsGeneral
|
|
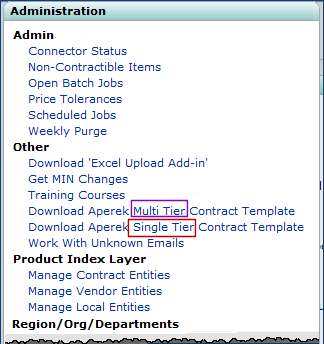
Aperek Contract Template Sourcing & Contract Management main Contents >Administration > Other > Download Aperek Contract Template > open |
 Download and save the new contract template from the Sourcing & Contract Management Administration menu.
- From Sourcing & Contract Management Administration, select Other > Download Aperek Contract Template (Figure 7).
Downloading the Contract Template
Sourcing & Contract Management main Contents > Administration
- The Windows File Download panel appears.
- On the File Download panel, click Save to save the contract template to a local file.
- The Windows Save As panel appears for you to designate the folder for the template.
- Select a folder and Save the template to the folder. - To use the contract template, open the Excel file.
Enter data in the contract template fields.
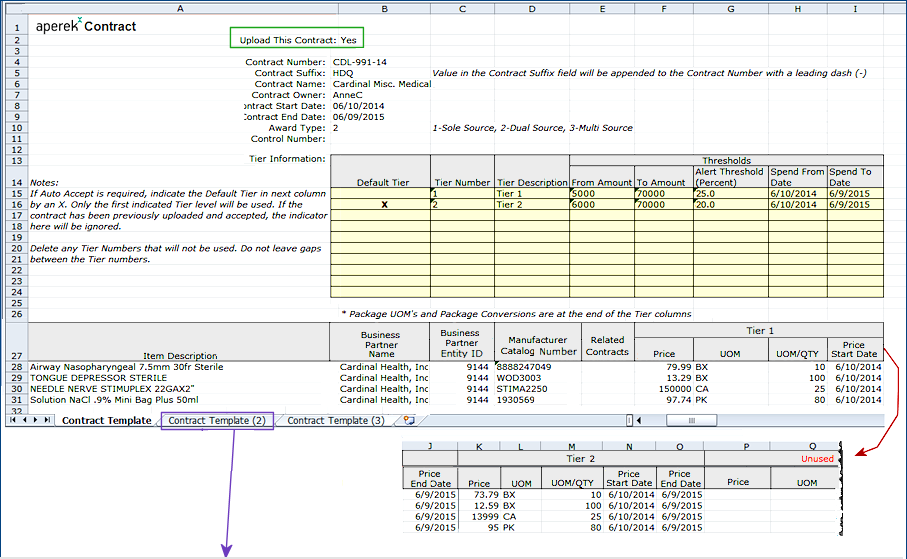
Contract Header Fields (Figure 6)
-
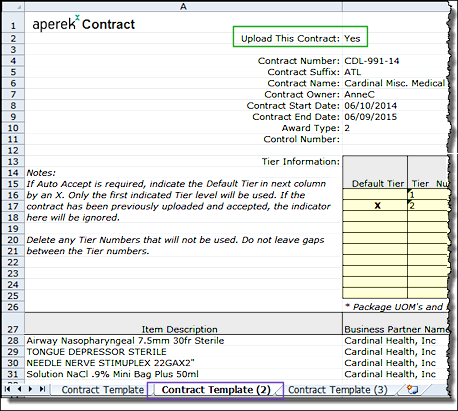
For each contract that you wish to upload, set the field Upload This Contract to Yes. This field is located at the very top of each worksheet (Figure 6, green box). The default for the first worksheet is always Yes. For all other worksheets, the default is No. So, if you have multiple contracts to upload, you need to set this field to Yes on each worksheet. The user for the example contract (Figure 6, inset) has entered Yes on the second worksheet.
Enter the Contract Number. If you are uploading multiple contracts, enter a different Contract Suffix on each contract's worksheet.
Complete the optional Contract Owner field, the Contract Start and End Dates (required), and the Award Type (required). If you leave the Contract Owner blank, it defaults to the ID of the person uploading the contract.
You can enter an optional Control Number (15 characters, maximum). (See the online topic "Using Control Numbers.")
Tier Fields (yellow) (Figure 6)
- When you first download the Contract Template, it contains space for ten tier levels. If you are using less than ten, blank out fields for those tiers that you do not need.
- The contract example has only two tiers. The other eight are not applicable, and the user has blanked out columns for those tiers. (Notice that the yellow rows in the Tier Number column in the example under tier 2 are empty. - For each tier, enter the Tier Number and Tier Description.
Optionally select the default tier by entering X in the Default Tier column.
- You can upload multiple tiers, but only one can be the default. (If two tiers are accidentally both marked as default, the system uses the first one in order.) In the example, tier 2 is the default.
- If you designate a default tier, when the contract is uploaded, the contract is automatically accepted. The acceptance date is the same as the upload date.
- If you do not designate a default tier, then you need to accept the contract manually from the Contract Workbench. - Optionally, you can provide data in these fields:
- The From Amount and To Amount values define the lower and upper dollar boundaries for each tier. If you wish to track tier threshold spend on the contract, be sure to enter values in these fields.
- The Alert Threshold Percent is the point at which you wish to be alerted about spend on the contract tier. For example, if the upper tier boundary (To Amount) is $100,000.00, and you want to know when you are at $90,000 (or 90 percent of the way to the upper boundary), set an Alert Threshold Percent of 90.Note: You need to set the alert separately from specifying the threshold. You can set either a message or an eMail alert, or both. See "Use tier threshold spend alerts."
- The Spend From Date and the Spend To Date, which define the time period within which you want to monitor spend on the tier, and receive an alert if spend reaches the Alert Threshold Percent.
Item Fields (white) (Figure 6)
For each item, enter...
- The Item Description.
- The Business Partner Name and Business Partner Entity ID.
These values are associated with a manufacturer entity in the Product Index Layer. You can look up business partners using the Sourcing & Contract Management Administration menu. Click Administration > Product Index Layer > Manage Contract Entities. - The Manufacturer Catalog Number (this value is the manufacturer's item number -- MIN) and the contract number of any Related Contract.
- For each tier that you wish to import, enter the Price, UOM, conversion factor (UOM/QTY), the Price Start Date, and Price End Date for each item. The number of tiers for which you enter data must match the tiers you identified in the yellow columns.
Sourcing & Contract Management uses red text in the tier column header for unused tiers. In the example contract, since there are only two tiers, Unused appears where tier 3 data would go (and also for any subsequent tiers). - If you need to enter packaging information for any item (on any tier), the packaging columns (Pkg UOM, Pkg Conversion Factor) are at the far right of the worksheet. Scroll left.
Upload the Contract(s)
You can upload contracts directly from Excel as long as you have the Excel Upload Add-In installed. You can also upload contracts from the Sourcing & Contract Management Load and Activate panel.
To upload contract(s) from Excel:
- Make sure that the Excel Upload Add-In is installed. (Instructions are in the online chapter.)
- Open the Excel file containing the contract(s).
- Locate the Sourcing & Contract Management sign-on button for your version of Excel.
- On Excel 2003 or Excel 2007, the Sign-on button is visible on one of the toolbars.
- With Excel 2010, click the Add-Ins menu to access the Sign-on button. (The Upload Contract button is next to the Sign-on button, but it is grayed out until you sign on successfully.) - Click Sign-on. A panel opens for you to sign on to Sourcing & Contract Management.
- When you have signed on, click
Upload Contract.
You receive a message about the contract upload.
Uploaded contracts are automatically accepted, and appear on the Contract Workbench for review and activation.
Exporting contracts: Excel format options
When you export a contract from Aperek -- for example, using the Export Contract link on the "Work with Contract" Actions panel, you can select the Excel format for the contract file. The new, multi-tier, multi-contract format is available, but you can also select the simple, one tier-format. See the online documentation topic "Export a Contract" for details.
 The definition of "default" tier for a contract has changed: the default tier is the highest activated tier.
The field name on the Contract Info panel (Figure 8) panel has been changed from Tier Level to Default Tier.
- A contract's default tier is the highest tier activated on the contract.
- When no tier is activated, the default tier is the highest accepted tier.
If an activated contract is updated, and a new vendor is available, activating the new vendor's prices occurs at the default tier. Once a contract is activated, the default tier cannot be changed.
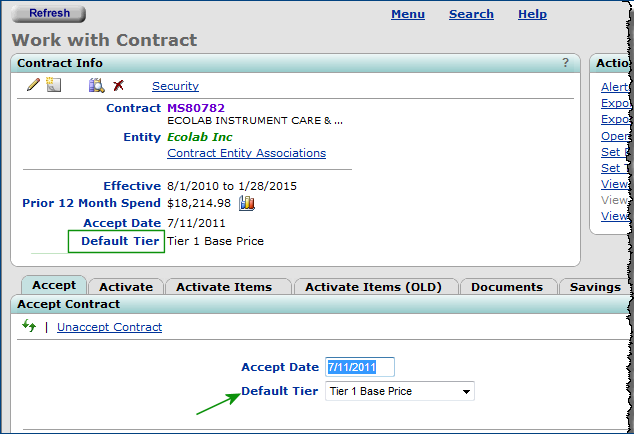
The Contract Info Panel
Sourcing & Contract Management main Contents Supplies > Contracts > Contract Workbench > Contracts tab > select contract
The Contract Tier Threshold panels provide a single view of spend on all contracts as spend approaches current tier boundaries.
The Contract Tier Threshold feature makes it easy to identify contracts whose spend is about to reach -- or has reached -- the upper boundary of the currently activated (default) tier. This feature lets you monitor spend as it approaches upper tier boundaries so that you can make purchases at the next tier as soon as possible. The following is a summary of the feature. Additional details are in the online documentation topic.
Definitions:
Threshold is the amount spent in the currently activated tier as a percent of the amount needed to reach the tier's upper dollar boundary.
For example, if a contract's lower and upper tier boundaries are $0.01 and $10,000, then spend of $7,000 is at the 70% threshold. When spend reaches $10,000.00, it is at the 100% threshold, and has arrived at the upper boundary of the activated tier. To put it another way, spend on a contract that is 70% "of the way" to the current tier boundary is at the 70% threshold, approaching the next tier.
Default tier: The currently activated tier.
- Important: To display tier threshold spend on a contract, you must enter the tier boundary amounts for the contract. Use the "Work with Contract" Actions panel link Set Tier Level Thresholds, and enter a From Amount and To Amount for tiers. If you are importing contracts with the Aperek Contract Template, you can enter the tier boundaries on the contract worksheet.
- To access Contract Tier Thresholds, from the Sourcing & Contract Management main Contents, select Contracts > Contract Tier Thresholds.
The "Contract Tier Thresholds" main page appears, open to the Threshold Summary panel (Figure 9).
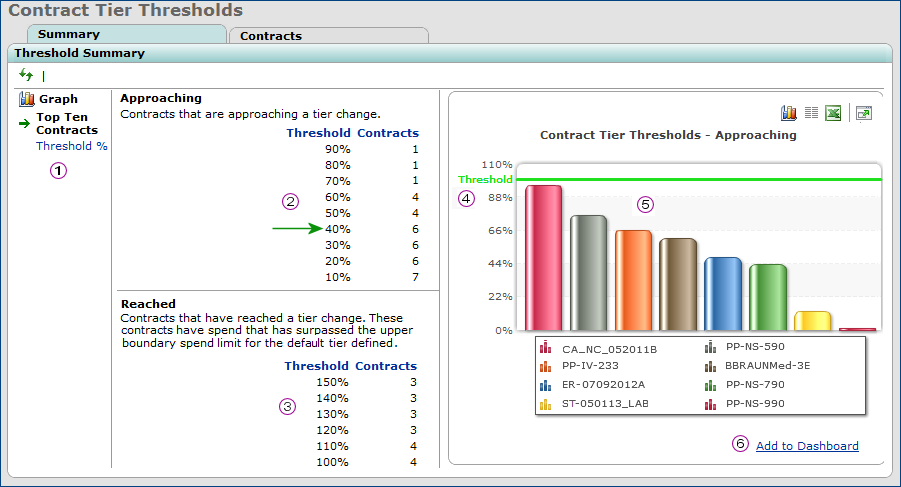
The Threshold Summary Panel: Bar Graphs for the Top Ten Contracts
Sourcing & Contract Management main Contents Supplies > Contracts > Contract Tier Thresholds
The summary panels provide a single view of spend at various thresholds across all contracts. Two tables are available:
- Approaching table: When a contract appears in the approaching section it means that the contract is approaching a tier change. The Approaching table lists the number of contracts whose spend thresholds are at least 10% but less than 100% of the activated tier's upper boundary. Clicking any percentage value in the table displays the contracts at or within 10% of that threshold.
- Reached table: lists the number of contracts that have reached the current tier boundary, with spend thresholds between 100% and 150%, or greater. These are contracts that have spend at, or over their default tier.Clicking any percentage value in the table displays the contracts that have reached or exceeded the tier threshold.
The data in the Approaching and Reached tables is mutually exclusive: a contract can appear in one table, or the other, but not both.
A bar graph of tier thresholds for the top ten contracts is displayed initially. ("Top ten" means the ten contracts with spend closest to the 100% threshold on the activated tier.) You can also display a line graph of thresholds for all contracts.
From the contract perspective, you can display contracts whose spend has reached a selected threshold in the current tier, or has reached the current tier boundary. Drilling down to threshold details for any contract displays data for all of the contract's tiers.
In Figure 9:
![]() The links on the left change the graph.
The links on the left change the graph.
Top Ten Contracts displays a bar graph for the top ten contracts (See Figure 9). These are the ten contracts with spend closest to the upper boundary of the activated tier.
Threshold % displays a line graph for all contracts.
![]() The Approaching table lists the number of all contracts with thresholds greater than 10% but less than 100% of the default tier boundary. For example (Figure 9, green arrow) six contracts have spend that is at least 40% but less than 50% of the amount needed to reach the tier's upper boundary. Clicking any percentage value displays the contracts at that threshold.
The Approaching table lists the number of all contracts with thresholds greater than 10% but less than 100% of the default tier boundary. For example (Figure 9, green arrow) six contracts have spend that is at least 40% but less than 50% of the amount needed to reach the tier's upper boundary. Clicking any percentage value displays the contracts at that threshold.
![]() The Reached table lists the number of all contracts that have reached or exceeded the amounts needed to attain the upper boundary of their default tiers. These contracts range between those at the 100% threshold to 150%, or greater. For these contracts, pricing at the next tier should apply. As with the Approaching table, the count of contracts is for each ten-percent interval; e.g., between 100%, but less than 110%; more than 110% but less than 120%, etc.
The Reached table lists the number of all contracts that have reached or exceeded the amounts needed to attain the upper boundary of their default tiers. These contracts range between those at the 100% threshold to 150%, or greater. For these contracts, pricing at the next tier should apply. As with the Approaching table, the count of contracts is for each ten-percent interval; e.g., between 100%, but less than 110%; more than 110% but less than 120%, etc.
Hint: Mouse over the Threshold column header in each table for an explanation of what is included.
![]() The bar graph displays the current tier threshold for each of your top ten contracts. The vertical direction (left side) is threshold. Each contract is assigned a color, and the contracts and colors are listed in the key at the bottom of the graph. The green line is the 100% threshold. It is a reference point for data on the graph.
The bar graph displays the current tier threshold for each of your top ten contracts. The vertical direction (left side) is threshold. Each contract is assigned a color, and the contracts and colors are listed in the key at the bottom of the graph. The green line is the 100% threshold. It is a reference point for data on the graph.
![]() Mousing over any bar displays the contract number, the current tier, the next tier, the current spend, and the precise tier threshold represented by the current spend.
Mousing over any bar displays the contract number, the current tier, the next tier, the current spend, and the precise tier threshold represented by the current spend.
 The bar graph can be added to a dashboard. Click Add to Dashboard. (See the online chapter "Using Dashboards" for details.)
Clicking Threshold % (Figure 9) ![]() on the left changes the bar graph to a line graph (Figure 10).
on the left changes the bar graph to a line graph (Figure 10).
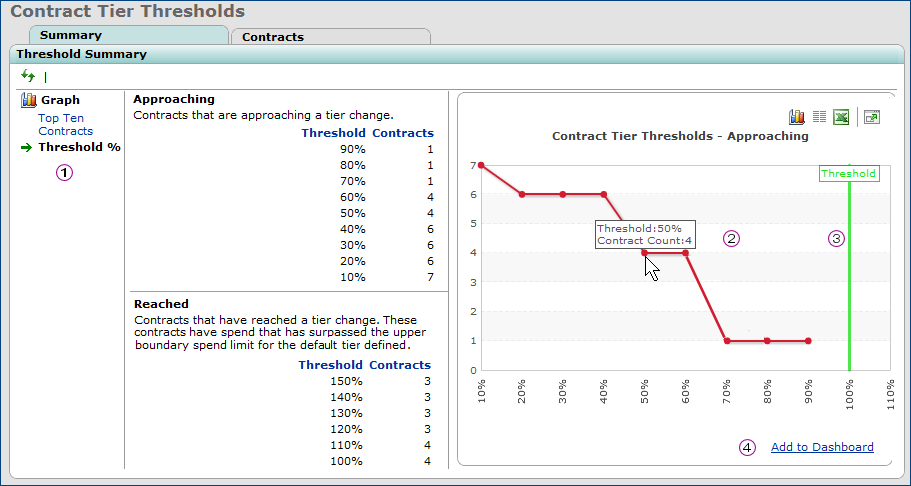
The Threshold Summary Line Graph
Sourcing & Contract Management main Contents, select Contracts > Contract Tier Thresholds
In Figure 10:
![]() The links change the graph between a bar graph and a line graph
The links change the graph between a bar graph and a line graph
![]() The line graph (right side) displays spend for contracts approaching tier boundaries. The horizontal bar (bottom bar) is spend thresholds. The vertical bar (left bar) is the number of contracts.
The line graph (right side) displays spend for contracts approaching tier boundaries. The horizontal bar (bottom bar) is spend thresholds. The vertical bar (left bar) is the number of contracts.
Mousing over any node on the graph displays the number of contracts with spend at the threshold. In Figure 10, for example, four contracts are at the 50% threshold. That is, spend for four contracts is between 50% and 60% of the way to the tier's top boundary.
![]() Notice in Figure 10 that the green line again marks the 100% threshold. In the figure, no contract has spend that has reached its upper tier boundary, although the graph does show spend for at least one contract at the 90% level.
Notice in Figure 10 that the green line again marks the 100% threshold. In the figure, no contract has spend that has reached its upper tier boundary, although the graph does show spend for at least one contract at the 90% level.
![]() The line graph can be added to a dashboard. Click Add to Dashboard. (See the online chapter "Using Dashboards" for details.)
The line graph can be added to a dashboard. Click Add to Dashboard. (See the online chapter "Using Dashboards" for details.)
If you have selected a particular percentage on the Threshold Summary panel Approaching table (say 70%, Figure 11), click the Contracts tab to display all contracts with thresholds greater than the percentage (e.g., 70%) but less than the next percentage (e.g., 80%) . The Contract Tier Thresholds panel (Figure 12) lists all contracts with a tier threshold percent in the interval selected in the Approaching list.
Alternately, you can click the Contracts tab directly, without making any selection in the Threshold Summary panel Approaching table. The Contract Tier Thresholds panel (Figure 12) appears with contracts at a default threshold of 80%, but you can select a different percentage.
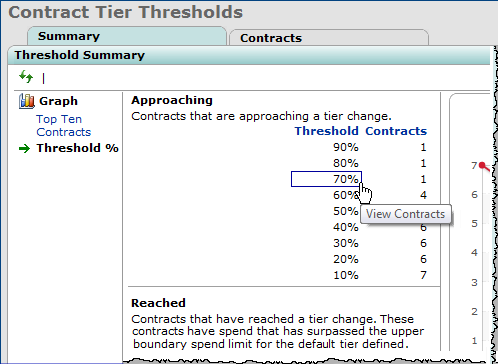
Linking to Contracts at a Tier Threshold of 70%
Sourcing & Contract Management main Contents, select Contracts > Contract Tier Thresholds
On the left side of the Contract Tier Thresholds panel (Figure 12) are a series of filters.
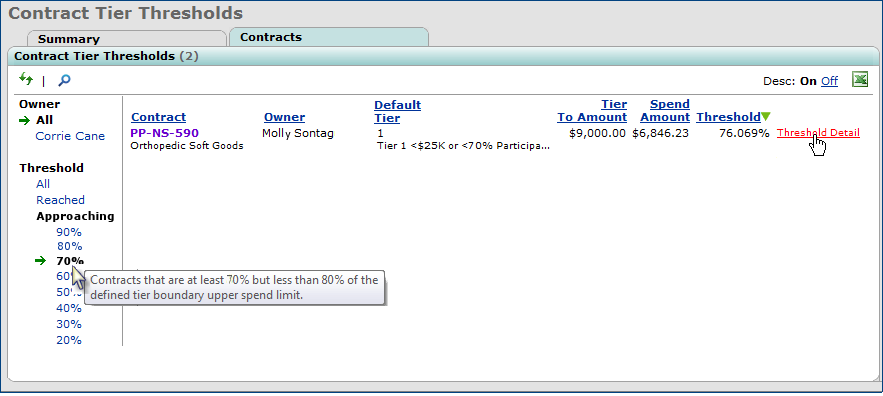
Contracts With Tiers at the 70% Threshold but Less than 80%
Sourcing & Contract Management main Contents, select Contracts > Contract Tier Thresholds > Contracts tab
Owner displays contracts for All owners, or only for yourself.
Threshold filters the data among...
- All contracts and their thresholds,
-
contracts with spending on the default tier that has Reached and exceeded the upper tier boundary,
- contracts Approaching the tier boundary within a selectable range of thresholds.
Note: A single contract only appears in this list once as either reached or within the selected range.
- To display contracts with thresholds in a different range, select a new percentage under Approaching.
In Figure 12 contracts within the 70% interval are displayed. One contract has a 76.069% threshold. The spend amount is 76.069% of $9,000.00. When spend on the contract reaches $9,000, it will be at the tier boundary, and the Threshold will be 100%. Monitoring this contract will help you get pricing moved to the next highest tier.
Link to Threshold Details
- To view threshold details for tiers on a contract, next to the contract (Figure 12), click Threshold Detail.
The page "Work with Contract Tier Thresholds" appears. Figure 13 is an example of a contract with multiple tiers. Tier 1 is the default tier.
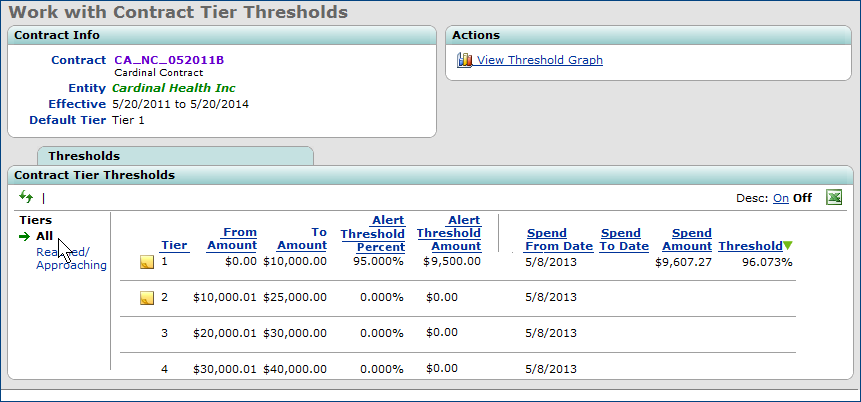
Contract Tiers Thresholds: All Tiers
Sourcing & Contract Management main Contents, select Contracts > Contract Tier Thresholds > Contracts tab > Threshold Detail
On the Contract Tier Thresholds panel, the Tiers filter displays All tiers in the contract, and their spend thresholds, by default. You can also filter the panel for tiers that have Reached or are Approaching tier boundaries. Figure 14 is an example of data from Figure 13.
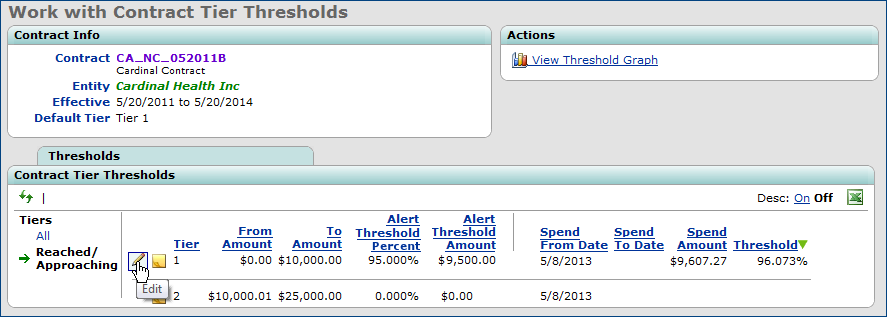
Contract Tiers Thresholds: Reached/Approaching Tiers Only
Sourcing & Contract Management main Contents, select Contracts > Contract Tier Thresholds > Contracts tab > Threshold Detail
On the Actions panel, clicking View Threshold Graph displays a graph of all tiers for the contract that have either reached or are approaching the tier threshold.
Setting an alert threshold percent for a contract has changed.
You can set an alert to notify you when spend on a contract tier reaches a particular threshold, as the spend approaches the tier's upper limit. You first specify the alert threshold as a percent of spend on the tier, and then configure the alert itself for your preferred communication method. In this release, how you specify the alert threshold percent has changed.
Usage: To specify an alert threshold percent for a contract,
- Open the contract.
- On the "Work with Contract" page Actions panel, click Set Tier Level Thresholds. A list of the contract tier levels, descriptions, tier boundaries, and alert threshold fields appears, along with additional information. (Figure 15).
- Click the edit icon next to the tier level for which you wish to set an alert. The Edit Tier Level panel appears (Figure 15).
- Enter the percent that you wish to define as the alert threshold in the field Alert Threshold (percent). Enter the percent value without the % sign. The percent can have a decimal portion, e.g., 65.70 percent.
- For example (Figure 15), to be alerted when spend is at least 90% of the way to the upper tier boundary, enter 90 (not 10).
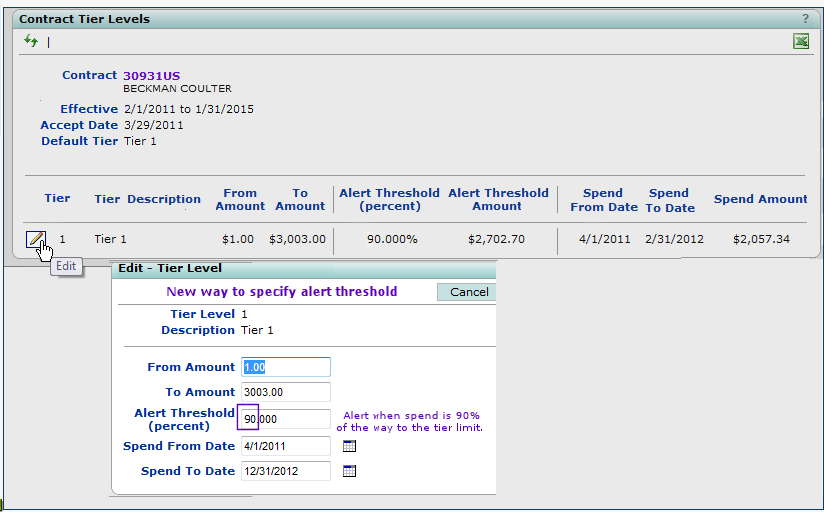
Setting an Alert Threshold for a Contract Tier
Sourcing & Contract Management main Contents Supplies > Contracts > Contract Workbench > Contracts tab > select contract > Actions panel > Set Tier Level Thresholds
Also, notice that the column Alert Threshold Amount has been added to the Contract Tier Levels panel.
Note: During the upgrade, sites with an alert threshold of 50% or lower will be adjusted. For example, if the current setting for the Alert Threshold (percent) is 15, the setting will be adjusted to 85 (i.e., 85%); a setting of 30 will be adjusted to 70 (70%), and so on.
Services Contracts
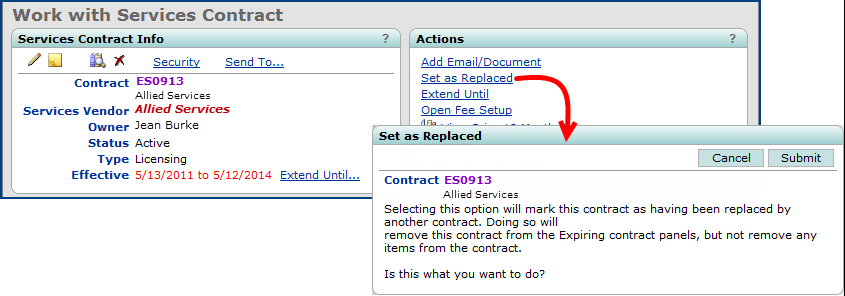
Setting a Shared Services Contract as Replaced will remove it from the Expiring Contracts list.
- A Set as Replaced link has been added to the actions panel of the "Work with Services Contract" page. This link appears for expiring contracts. Click the link to set the contract as Replaced. A popup appears, stating that the contract will be removed from the Expiring Contracts panels, but none of the items will be removed. Click Submit to complete the action. (See Figure 16.)
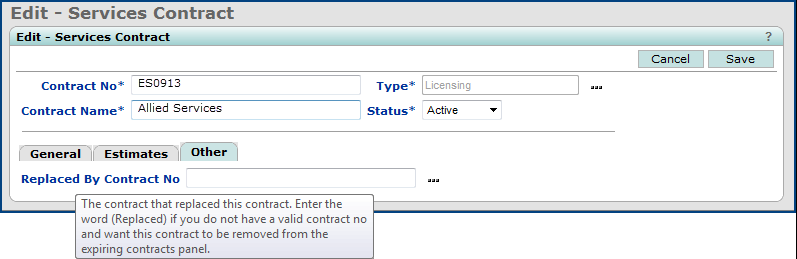
- On the Edit - Services Contract panel, a new tab -- Other -- has been added. On the Other tab, a field called Replaced By Contract No lets you enter the number of the contract that replaces the contract you are editing (or simply the word "Replaced" if you do not know the number). Doing so will cause the replaced contract (in the sample below, Contract No ES0913) to be removed from the Expiring Contracts list. (See Figure 17.)
Set as Replaced
Sourcing & Contract Management main Contents > Shared Services > Contract Workbench > open contract
Setting a "Replaced By" Contract Number on a Services Contract
Sourcing & Contract Management main Contents > Shared Services > Contract Workbench > open contract > edit contract
Projects
Item lines in benchmark data and in returned proposals can be edited.
You may receive a set of benchmarks or bid data that you need to edit because of incorrect item information. A classic example is the wrong UOM for a unit price. You can edit benchmark lines to correct information such as this. You can also edit bid lines, as long as no contract has been awarded. Details are in the online documentation chapter for bids and for benchmarks.
Panel Changes
The panel that creates a contract from a bid has been revised to include tier information.
In an Analysis project, you can award a contract to a bid by clicking Award Contract to Bid next to the bid of interest (Figure 18). Sourcing & Contract Management displays the Bid-To-Contract panel that creates the contract for you.

Opening the Bid-To-Contract Panel to Award a Contract
Sourcing & Contract Management main Contents > Supplies > Projects > select project > Proposals
The Bid To Contract panel (Figure 18) now includes optional tier Thresholds fields.
- The From Amount and To Amount values define the dollar amounts for the lower and upper tier boundaries.
- The Alert Threshold Percent is the point at which you wish to be alerted about spend on the contract tier. For example, if the upper tier boundary (To Amount) is $100,000.00, and you want to know when you are at $90,000 (or 90 percent of the way to the tier boundary), set an Alert Threshold Percent of 90.
- The Spend From Date and the Spend To Date define the time period within which you want to monitor spend on the tier, and receive an alert if you reach the Alert Threshold Percent. (Note: You need to set the alert type and method separately. See Use tier threshold spend alerts.)
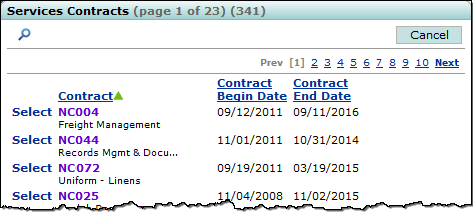
The list of contracts for selecting a replacement services contract now shows the Contract Begin Date and Contract End Date for each contract.
The Edit - Services Contract panel now contains three tabs: General, Estimates, and Other. (See Figure 17.) The Services Contracts panel is displayed when you select the General tab and click the prompt icon for the Replaces Contract No field, or when you select the Other tab and click the Replaced By Contract No field. The Contract Begin Date and Contract End Date are now supplied for each contract. (See Figure 19.)
Contract Begin and End Dates
Sourcing & Contract Management main Contents > Shared Services > Contract Workbench > open contract > edit contract > Other tab > click ... prompt
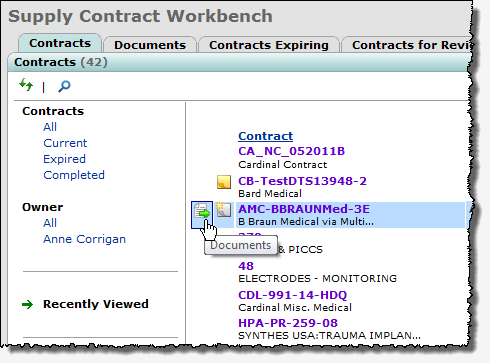
A new icon  on supply and services contracts lists lets you access a contract's documents directly.
Figure 20 is an example of the documents icon ![]() on the "Supply Contract Workbench."
on the "Supply Contract Workbench."
Using The Documents Icon for a Contract on a List
Sourcing & Contract Management main Contents > Supplies > Contracts > Contract Workbench
Usage: To view a contract's documents,
- Mouse over the contract name. The documents icon and user notes icons appear (Figure 20).
- Click the documents icon to display all the documents attached to the contract from the Documents tab. Figure 21 is an example.

The List of Documents for a Contract
Sourcing & Contract Management main Contents > Supplies > Contracts > Contract Workbench > click documents icon ![]()
You can use the document icon on these panels which display a list of contracts:
"Supply Contract Workbench" Contracts tab
"Load and Activate Workbench" Accept/Activate
Contracts Tab
"Services Contract Workbench" Services Contracts tab
The icon is also available on the Supply and Services Search results panels when contracts are listed.
Pulse
The Med/Surg flag has been added to the Contract header panel for Sourcing & Contract Management contracts used by Pulse.
The Med/Surg flag lets you specify that a contract contains medical and/or surgical items.
When checked (the default), this flag prevents a contract from being loaded into Pulse so that your lists of items in Pulse do not contain irrelevant items, such as office supplies, plumbing supplies, or cleaning products.
This flag is also available on these contract report objects, so that you can run reports for only your medical/surgical contracts:
- Contract Header and Detail (CaA)
- Contract Header (CaA).
Figure 22 displays the field on the Contract header panel.
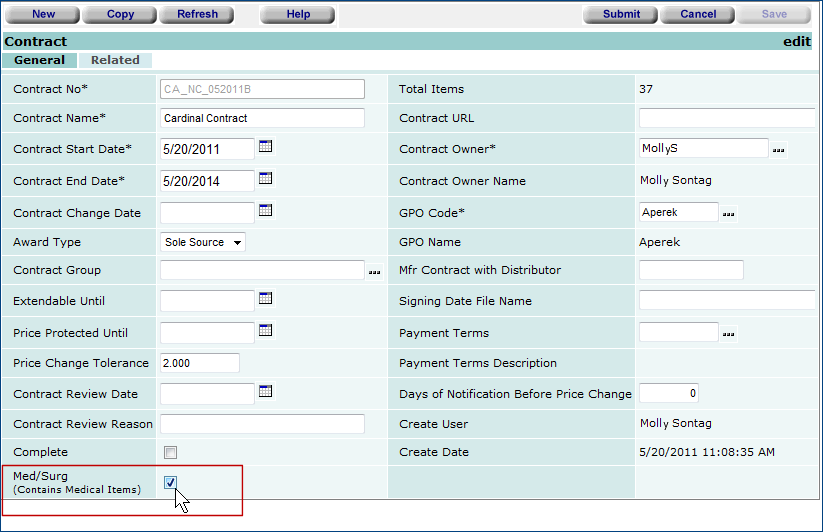
The Contract Header Edit Panel with the New Med/Surg Flag
Sourcing & Contract Management main Contents > Supplies > Contracts > Contract Workbench > edit contract > edit contract header
The Pulse Requisitioning feature is available: you can create requisitions and purchase orders for items used in Pulse cases.
During or shortly after a procedure, OR staff work with Pulse on a tablet computer to capture information about items used in the case. When the items have complete enough information, Aperek migrates the item information to the Pulse requisitioning feature. A requisition is the point where items used in Pulse cases enter the billing and invoicing stream in a hospital's supply chain. Requisitions also initiate the ordering process for items that need to be replenished.
Figure 23 is the location of the Pulse Requisitioning feature in Aperek Materials Management.
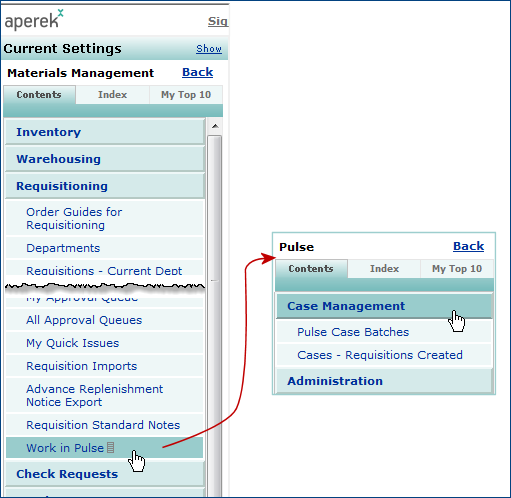
The Pulse Requisitioning Feature in Aperek Materials Management
You can create Pulse requisitions for several cases, for a single selected case, or for all available cases. You can run batch requisitioning as a scheduled job.
Requisitions created for Pulse cases are bill only. Pulse requisitions may optionally enter an approval process, then flow directly to unauthorized bill-only purchase orders, and invoices, and on to vendor payments. A separate purchase order is created for each requisition. When associated invoices arrive, they can then paid through Accounts Payable.
Detailed information about Pulse requisitioning is in the online topic "Create Requisitions for Pulse Cases."
Also see the discussion of the Bill Only field on the Item Inventory panel.
Supply Chain - Materials Management
Several inventory item record fields can now be edited even when the organization's catalog flags are set.
On the Organization panel, two flags -- Assign Expense Codes From Catalog and Assign Patient Charge Number (CDM) From Catalog -- control whether the default patient charge number (CDM), the billable code expense, and the non-billable code on item catalog records default to the item inventory record (Figure 24).
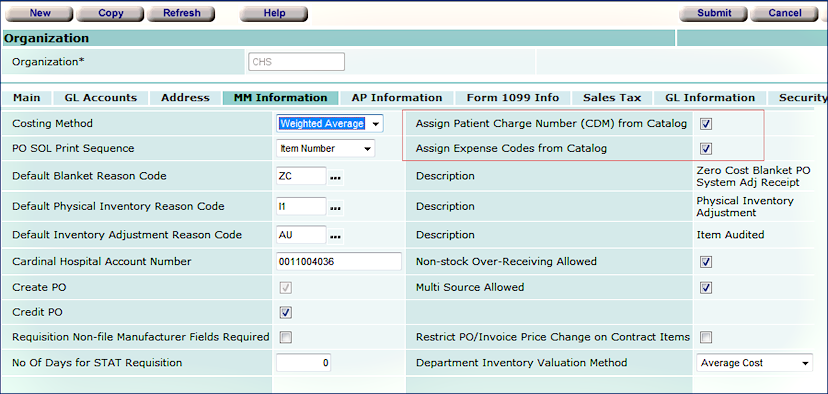
The Organization Record MM Tabbed Panel
Materials Management main Contents > Tables > Organizations > ![]()
Previously, if no values are specified as the defaults on an item catalog record, when the organization flags are set, the fields could not be entered on an inventory record. In this release, the restriction is lifted: even when the organization flags are set, if an item catalog record contains no values for default Patient Charge Code (CDM), Billable Expense Code and Non-Billable Expense Code, the item inventory record can be edited and values for the fields entered.
The "Pick & Delivery Document" has been enhanced.
The new "Pick & Delivery Document" (Figure 25) has been improved to more clearly indicate the quantities that have not been picked because they have been either backordered or killed.
The new document includes a subgroup called Items To Pick, including a new field, BO Killed. The BO Killed column displays Yes if the Allow Backorder flag on the requisition is OFF, or if the backorder is cancelled.
Below Items To Pick is another subgroup labeled These Items Were Not Picked. It includes fields for quantities backordered or killed. The Qty Killed field replaces the Qty To Pick column in the Items Not Picked subgroup.
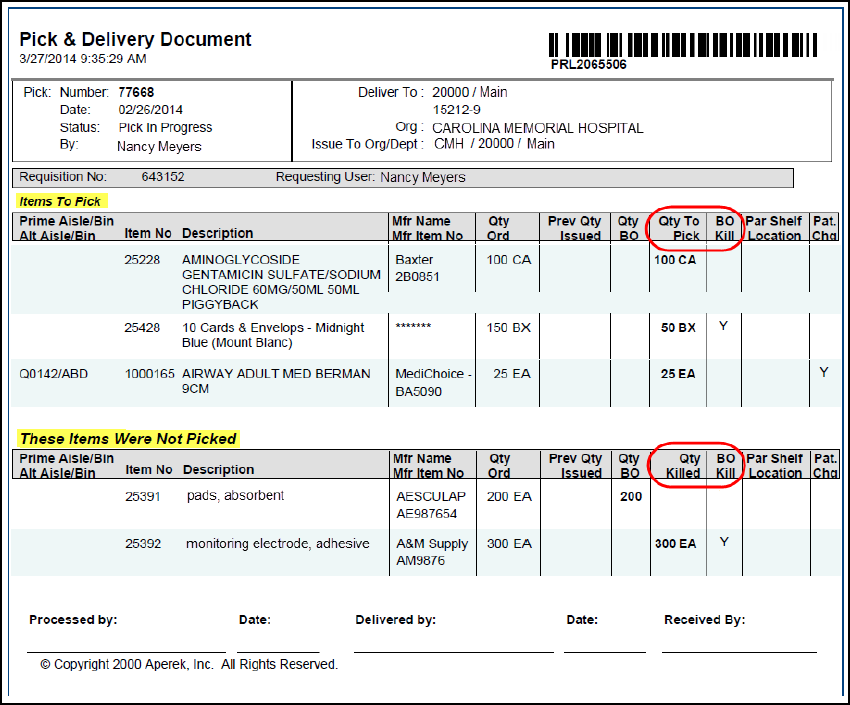
Pick & Delivery Document
MM > Warehousing > Pick List > Menu > Print Pick/Delivery Document
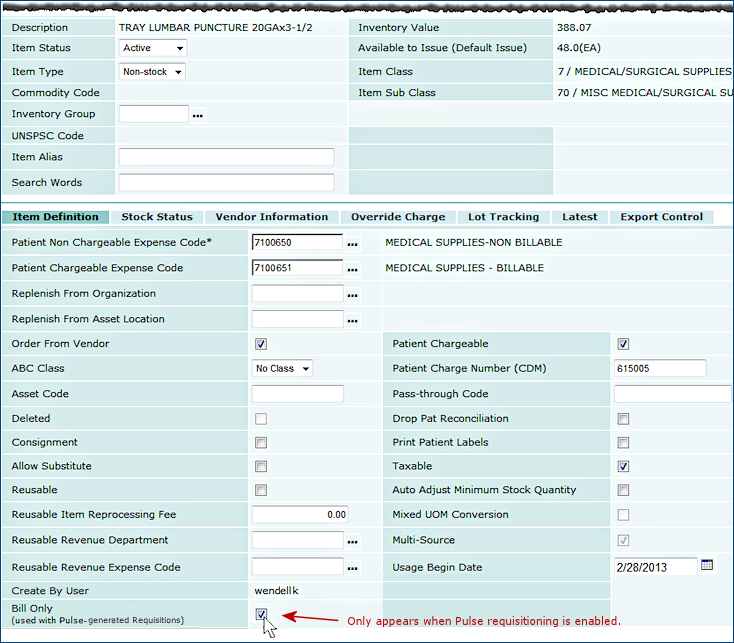
Pulse requisitions only: a field on the Item Inventory record lets you designate the item as a "bill-and-replace" item.
When you are creating Pulse requisitions, item inventory records contain a field that lets you specify whether bill-only requisition lines for an item should be "bill-only" or "bill-and-replace." The field is Bill-Only. This field is located on the Item Inventory panel's Item Definition tab (Figure 26).
The Item Inventory Edit Panel Bill Only Field
Materials Management main Contents > Item Catalog > Item Inventory or Item Catalog > Item Inventory -- All Locations > edit or inquire.
You can requisition a Pulse item as bill-only or bill-and-replace based on the setting of the item inventory Bill Only field.
The field is unselected, by default.
- If Bill Only is selected by a user, the requisition line for the item is bill-only.
- If Bill Only is unselected (the default), the requisition line for the item is bill-and-replace.
To access the Item Inventory panel,
- From the Aperek Materials Management main Contents, select Item Catalog > Item Inventory or Item Catalog > Item Inventory -- All Locations.
- Use the Search or the Quick Filters to find the item of interest.
- Click Menu > Edit (or the edit icon
 ) to edit the item record, or inquire (i) to view it.
The Bill Only field and its selection also appears on the item inventory report objects: "Item Inventory," "Item Inventory All Vendors," and "Item Inventory User Fields."
The new Vendor Locations panel lets you search for locations by phone or fax number.
Under Vendors in both the Materials Management and AP menus, you will now find a Vendor Locations option (Figure 27). Click this new option to display a list of vendor locations for your organization (Figure 28).
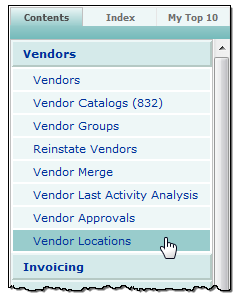
Vendor Locations in Vendors Menu
MM/AP > Vendors
The two tab views on the Vendor Locations panel are Buy From Location and AP Location. These tabs differ from the views of buy-from locations and AP locations accessible through the Vendors panel menu; the Vendor Locations panel allows you to view locations for all vendors, and it allows you to search for a location by telephone or fax number.
To search for a vendor, click the Search link. On the search panel that appears, you can do a full text search for the Vendor Number, AP Buy From Location, Address Name, or Address Line 1. You can search by Contact Telephone No or Contact Fax No using numeric values only. (See Figure 28.)
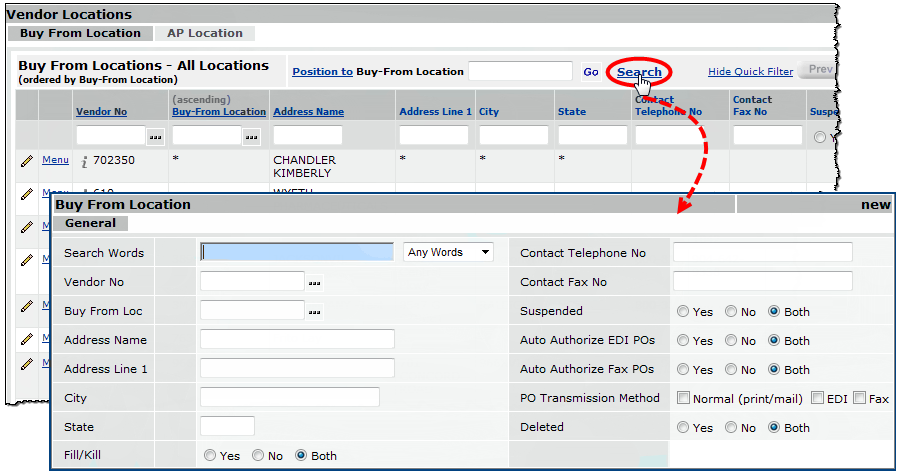
Search Vendor Locations
AP or Materials Management main Contents > Vendors > Vendor Locations > Search
You can now flag a requisition line as Direct Delivery on either the File Item or Non-File Information tabs.
On the Requisition Line panel (Figure 29), the Direct Delivery flag has been removed from the Overrides tab and added to the File Item Information and Non-File Item Information tabs to increase its visibility during the creation or editing of requisition lines.
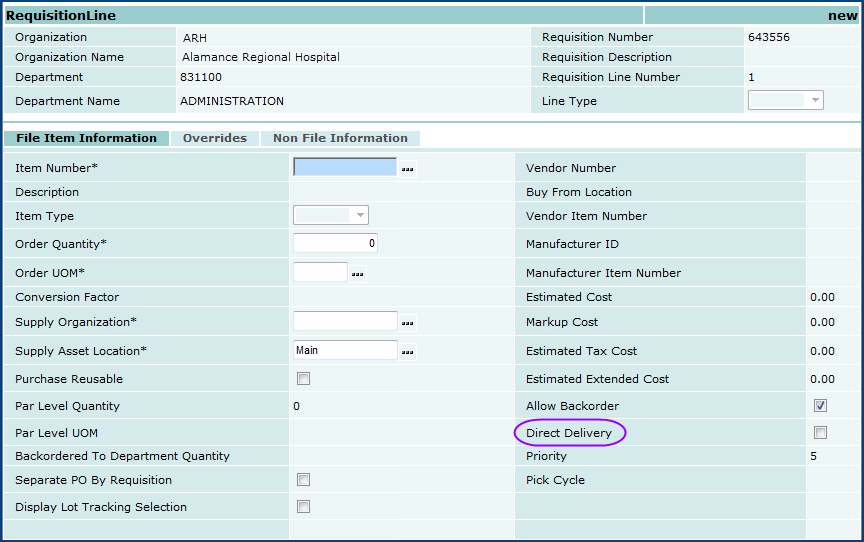
Direct Delivery Flag
Materials Management main Contents > Requisitioning > Requisitions - Current/All Depts - new/edit requisition > edit/new requisition line
Panel Changes
- A new field, Last Update Date, has been added to the Physical Inventory list to enable you to see when a particular physical inventory was last completed.
Financials - Accounts Payable and General Ledger
The 1099 Years list is restricted by the user's data profile.
You can only see 1099 year data for organizations permitted in your data profile. Figure 30 is an example of the list. In the example, the user's data profile does not include organization 002. This organization's 1099 data does not appear on the list.
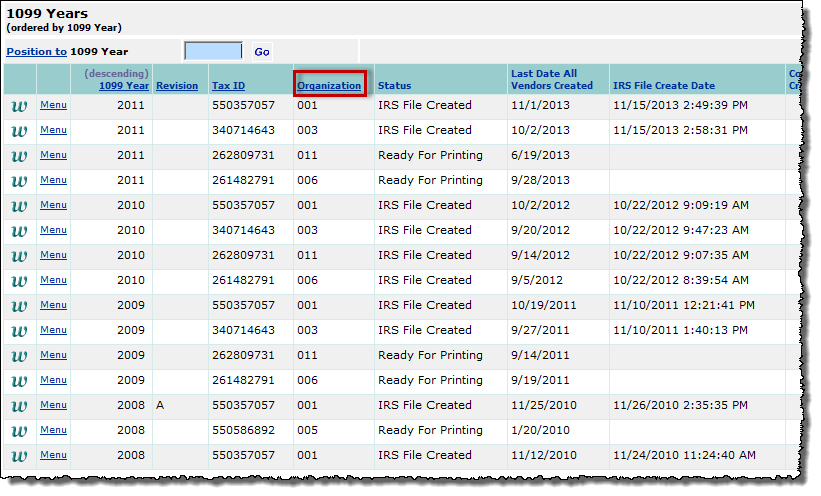
The 1099 Years List
Accounts Payable main Contents >1099-MISC Processing > 1099 Years
Administration
You can now view audit information on approver group lists and individual approver users in Requisitioning and Invoicing.
When you view the Approver Groups list in Requisitioning, you can select a new Menu item -- View Audit Info -- to display changes that have been made to the approver group. (See Figure 31.)
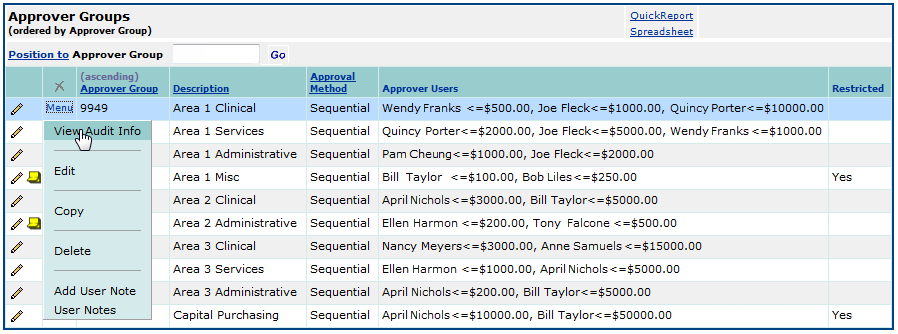
Accessing Audit Information for an Approver Group
Aperek main Contents > Materials Management > Requisitioning > Approver Groups
This menu item is available on the Approver Group Edit panel as well, so you can view changes made to individual approver users.
View Audit Info has also been added to the Menu on the Invoice Approver Groups and the Invoice Approver Group Edit panels
(Aperek Main TOC > Materials Management > Invoicing > Invoice Approver Groups).
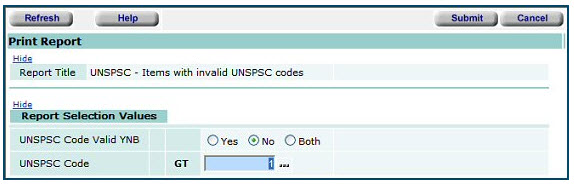
Reports
New reports/report objects
- A new report object "Product Index Layer Item Extract" allows Sourcing & Contract Management sites to export Product Index Layer information from Aperek to update your site's materials management system (for systems other than Aperek's).
Note: This report is only available at Sourcing & Contract Management sites that have the Product Index Layer Search enabled. If this report is not available at your site, and you wish to use it, contact the Help Desk.
- If the Product Index Layer Search is not enabled at your site, the "Product Index Layer Item Extract" report object is not visible in the Report Objects list.
- This feature is subject to the users' data profile settings.
These fields are on the "Product Index Layer Item Extract" report object:
| Vendor Loc Name | PIL Item Desc | |
| Vendor Loc | PIL Item Create Date | |
| Vendor Item No | PIL Entity Zipcode | |
| UNSPSC Code | PIL Entity URL | |
| Record Count | PIL Entity Tax ID | |
| Mfr Name | PIL Entity State | |
| Mfr Item No | PIL Entity Name | |
| Mfr ID | PIL Entity DUNS No | |
| Item Sub Class | PIL Entity Create Date | |
| Item No | PIL Entity Country | |
| Item Desc | PIL Entity City | |
| Item Class | PIL Entity Address Line 3 | |
| Vendor Set | PIL Entity Address Line 2 | |
| Vendor Entity Name | PIL Entity Address Line 1 | |
| PILUNSPSC Code | PIL Created | |
| PIL Updated | Orig Mfr Item No | |
| PIL Source Description | Noiseless Vendor Item No | |
| PIL Source | Noiseless Mfr Item No | |
| PIL Parent Entity Zipcode | Min Vin ID | |
| PIL Parent Entity URL | Manufacturer Catalog | |
| PIL Parent Entity Tax ID | Local Registered YNB | |
| PIL Parent Entity State | Local Registered YN Desc | |
| PIL Parent Entity Name | Item Vendor ID | |
| PIL Parent Entity Create Date | Item Sub Class Desc | |
| PIL Parent Entity Country | Item Class Desc | |
| PIL Parent Entity City | Item Catalog ID | |
| PIL Parent Entity Address Line 3 | Different UNSPSC Code YNB | |
| PIL Parent Entity Address Line 2 | Different UNSPSC Code Desc | |
| PIL Parent Entity Address Line 1 | Different Min YNB | |
| PIL Item No | Different Min Desc | |
| PIL Item Description | Catalog |
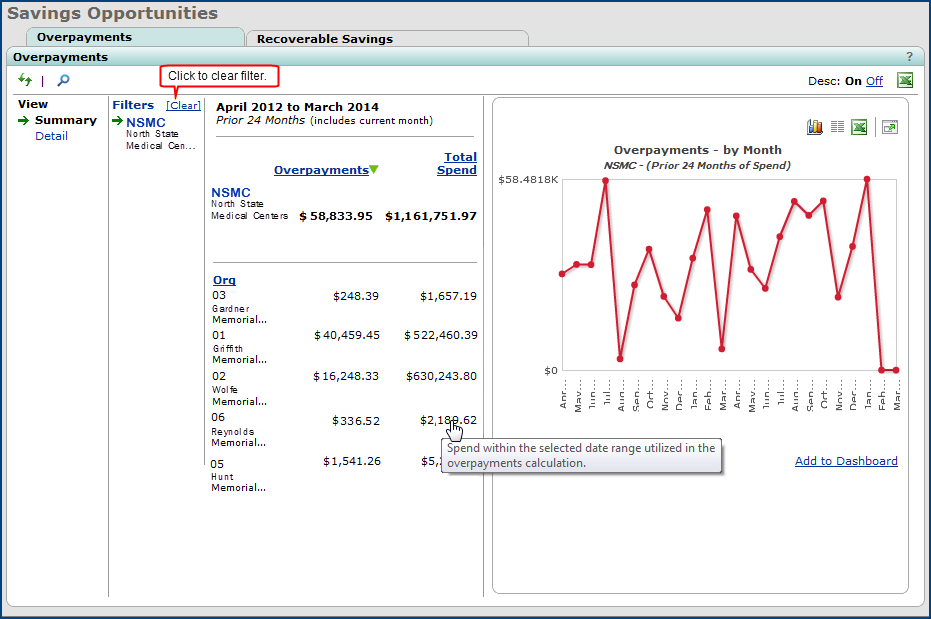
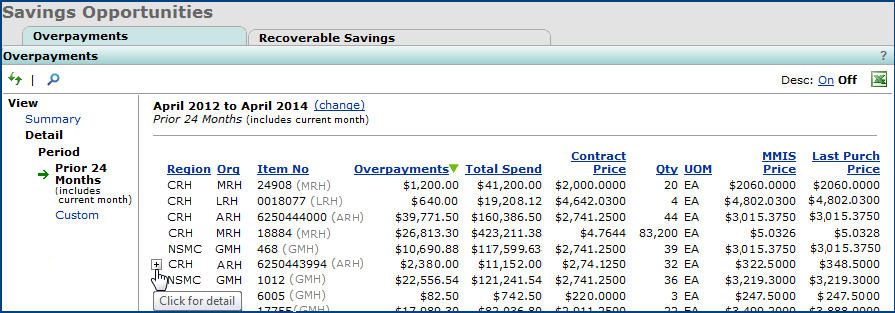
- A new report object, "Overpayments," allows you to print a detailed report of purchases made by your region or organization at higher-than-contract prices. The fields for this report are as follows:
| Accept Date | Line Amount | Spend Qty |
| Catalog | Line Amt At Contract Price | Spend Unit Cost |
| Contract Begin Date | Markup | Spend Unit Cost |
| Contract End Date | Mfr Item No | Spend Unit Cost |
| Contract Name | Month | Spend UOM |
| Contract No | Org | Tier Level |
| Contract Price | Org Desc | Total Spend |
| Current Tier Level | Overpayment | Tran Begin Date |
| Current Contract Price | PO Line No | UNSPSC Code |
| Extension Date | PO No | UNSPSC Code Desc |
| Invoice Line No | PO No Exp | Vendor Item No |
| Invoice No | Record Count | Vendor Loc |
| Invoice No Exp | Region | Vendor Name |
| Item Desc | Region Desc | Vendor Set |
| Item No | Spend Date | Year |
| Year Month |
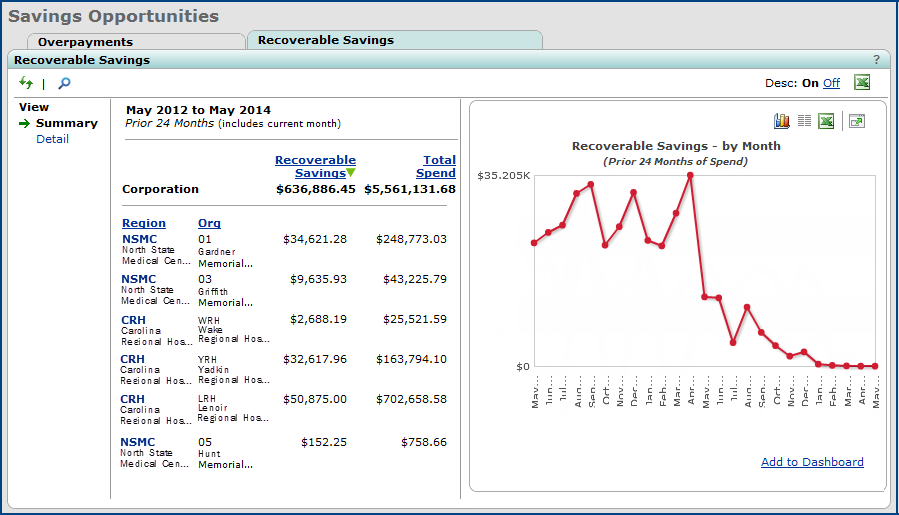
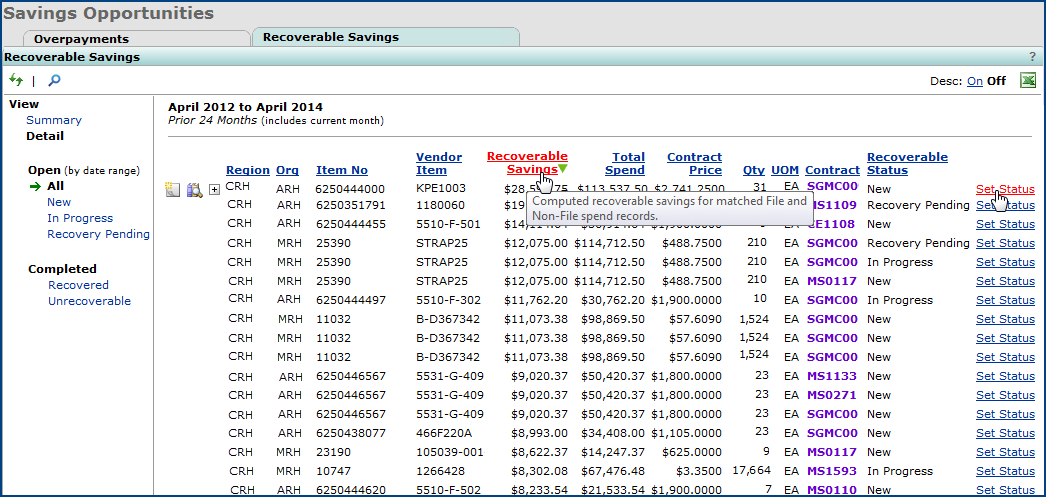
- A new report object, "Recoverable Savings," allows you to create a report detailing the recovery of overpayments of contract items.
The fields for this report are as follows:
| Accept Date | Item No | Region Desc |
| Amount Recovered | Line Amount | Spend Date |
| Catalog | Line Amt At Contract Price | Spend Qty |
| Contract Begin Date | Markup | Spend Unit Cost |
| Contract End Date | Mfr Item No | Spend UOM |
| Contract Name | Month | Tier Level |
| Contract No | Org | Total Spend |
| Contract Price | Org Desc | Tran Begin Date |
| Current Contract Price | PO Line No | Vendor Item No |
| Current Tier Level | PO No | Vendor Loc |
| Extension Date | PO No Exp | Vendor Name |
| Invoice Line No | Record Count | Vendor Set |
| Invoice No | Recoverable Savings Amt | Year |
| Invoice No Exp | Recoverable Status | Year Month |
| Item Desc | Region |
Fields added to report objects or changed.
- The new Med/Surg flag (on an Sourcing & Contract Management Contract header) is available on these contract report objects:
- Contract Header and Detail (CaA)
- Contract Header (CaA).
- The Bill Only field has been added to the item inventory report objects:
"Item Inventory," "Item Inventory All Vendors," and "Item Inventory User Fields."
See the previous note on this field. - The Vendor UOMs field has been added to the "Spend Item Detail (CA)" and "Spend Item Summary (CA)" reports.
- Fields have been added to the "OldObject" report object. The new fields are as follows:
- Pass Through Code
- Patient Charge Item No
- Patient Chargeable Expense Code
- Patient Chargeable Expense Code Desc
- Patient Non-Chargeable Expense Code
- Patient Non-Chargeable Expense Code Desc.
- Now that GLN account numbers can be added to department records, the fields Bill To GLN Code and Ship To GLN Code have been added to the "Department Master" report object.
- For each item number (ItemNo), the "Item Catalog" report object now contains separate fields for each of the different UOM/Factors (up to 5 factors, from lowest to highest) from the Primary Vendor Item UOM Factors field. The unit cost has been included for each UOM/Factor. The new fields are UOM1 through UOM5, Factor1 through Factor5, and UnitCost1 through UnitCost5.
- New fields have been added to the "Vendor Master" and "Vendor Locations" report objects:
- GLNCodeYNDesc: Indicates whether any buy-from location records for each vendor in the report use GLN codes. This value is "yes" when the field Use GLN for PO Communication is selected on the buy-from location record (Figure 32). Otherwise, the value is "no."
- GLNCodeYN: Numeric values of the GLNCodeYN field: 1 for "yes," 0 for "no."
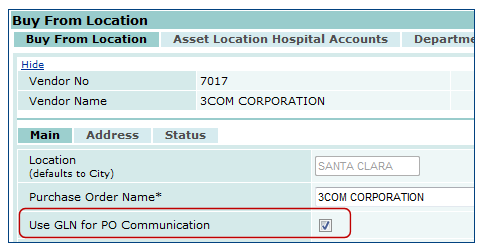
Vendor Buy-From Location GLN Flag
Materials Management main Contents > Vendors > locate vendor > Menu > Buy-From Locations > edit
Problem Resolutions
Supply Chain -- Materials Management
- Problem with receiving transfer requisitions.
When a transfer requisition (where the ordered UOM was not lowest UOM) was short picked and Allow Backorder was unchecked, the transfer requisition could not be received. The quantity to be received -- a fraction of the ordered UOM -- appeared as zero.
The transfer receipt process has been changed. Fractional Left To Receive amounts are now converted to the lowest UOM and displayed in the lowest UOM (if unevenly divisible).
- To receive this kind of transfer requisition, on the receipt line, click the UOM prompt, and select the lowest UOM. Notice that the UOM from the original requisition order and the lowest UOM are both available from the prompt (Figure 33).
![]()
Receiving a Line on a Transfer Requisition
Materials Management main Contents > Receiving > Receive Transfers
- Inquiring on a PO from within a Requisition Inquiry was returning an "Insufficient Information" error for requisitions created in an organization supplied by another organization.
This problem has been resolved. On requisitions created for any organization, even if supplied by another organization, clicking the inquiry on the PO now takes you to the Purchase Order Inquiry page. - Editing non-file PO lines from the Edit PO Lines panel generated incorrect account information under certain circumstances.
For a non-file PO line with a Charge Department Override value, if the line was edited using the Edit PO Lines list, Aperek could not find the charge override values and account validation produced an error. The problem has been resolved by pointing the system to the correct override charge department values so that the validation can proceed as designed.
Note: This problem was only occurring when GL Validation was enabled (at the system level) for a site, and when the non-file line was edited from a panel other than the full panel on the Non-File Items tab.
- Editing invoices during approval to resolve an out-of-balance status created several problems.
Here is the problem behavior that has been corrected:
When an invoice Pending Approval was changed so that it became "out-of-balance," the invoice Status was reset to Incomplete. After the invoice was re-balanced, its Status became Entered; however, the Pending Approval Status was lost.
Then, when the invoice was resubmitted, a new entry was created on the Invoice Approval Queue, and the invoice Status was again set to Pending Approval. The result was an extra approval queue entry.
A second problem -- that an "out-of-balance" invoice could be approved -- generated incorrect GL transactions.
These problems are resolved with the following changes:
- An invoice on the approval queue can no longer be approved when it is out-of-balance. This rule applies to both manual and PO invoices.
- When invoice distribution details are added or changed on an invoice that is Pending Approval, the invoice Status will no longer be reset. The invoice will remain as Pending Approval until rejected, or approved in-balance. - Problems occurred when reversing statistical journal vouchers were being imported.
The imports were not being processed because Aperek does not permit statistical journal vouchers to be designated as "reversing." The problem has been resolved with the following process: When a reversing statistical journal voucher is imported, an error message displays, prompting the removal of the reversing period and year. The journal voucher can then be resubmitted and processed.
Sourcing & Contract Management
- Matched line counts in the Work With Contract panels were displaying inconsistencies.
- In one instance, the problem was caused by corrupted data. This problem was resolved by data cleanup.
- In another instance, the problem was caused by rejected items that were included in the list for the "Select items for Activation"
panel. This problem has been corrected; rejected items are no longer included.
Copyright © 2023 by Premier Inc. All rights reserved.